How To Do Google OAuth Authentication With Phoenix and Elixir
A while back, I had to enable a login system using the OAuth via Google credentials in a Phoenix application. Quite a bit of this came from this nice article and this code repository by scrogson.
![]()
But as with all things in technology, there were a few bits that seemed to be out of date or were missing. This article fills in those gaps with a complete working solution so that you don’t have to Google around anymore.
Step 1 – Install the oauth2 hex package
If you don’t know how to install Elixir, I covered it in this article.
Configure your mix.exs file as follows:
# Type `mix help compile.app` for more information.
  def application do
    [mod: {MyApp, []},
     applications: [:phoenix, :phoenix_pubsub, :phoenix_html, :cowboy, :logger, :gettext, :phoenix_ecto, :postgrex, :timex, :oauth2]]
  end

  # Specifies which paths to compile per environment.
  defp elixirc_paths(:test), do: ["lib", "web", "test/support"]
  defp elixirc_paths(_),     do: ["lib", "web"]

  # Specifies your project dependencies.
  #
  # Type `mix help deps` for examples and options.
  defp deps do
    [{:phoenix, "~> 1.2.0"},
     {:phoenix_pubsub, "~> 1.0"},
     {:phoenix_ecto, "~> 3.0"},
     {:postgrex, ">= 0.0.0"},
     {:phoenix_html, "~> 2.6"},
     {:phoenix_live_reload, "~> 1.0", only: :dev},
     {:gettext, "~> 0.11"},
     {:cowboy, "~> 1.0"},
     {:oauth2, "~> 0.9"}]
  end
Step 2 – Create the authorization controller
You have to create an authorization controller with one slight change.
In the get_user! method user of your authorization controller you’ll have to use this line of code:
%{body: user, status_code: status} = OAuth2.Client.get!(client, "https://www.googleapis.com/plus/v1/people/me/openIdConnect")Here is the controller code:
defmodule MyApp.AuthController do
  use MyApp.Web, :controller

  @doc """
  This action is reached via `/auth/:provider` and redirects to the OAuth2 provider
  based on the chosen strategy.
  """
  def index(conn, %{"provider" => provider}) do
    redirect conn, external: authorize_url!(provider)
  end

  def delete(conn, _params) do
    conn
    |> put_flash(:info, "You have been logged out!")
    |> configure_session(drop: true)
    |> redirect(to: "/")
  end

  @doc """
  This action is reached via `/auth/:provider/callback` is the the callback URL that
  the OAuth2 provider will redirect the user back to with a `code` that will
  be used to request an access token. The access token will then be used to
  access protected resources on behalf of the user.
  """
  def callback(conn, %{"provider" => provider, "code" => code}) do
    client = get_token!(provider, code)

    user = get_user!(provider, client)

    conn
    |> put_session(:current_user, user)
    |> put_session(:access_token, client.token.access_token)
    |> redirect(to: "/")
  end

  defp authorize_url!("google"),   do: Google.authorize_url!(scope: "https://www.googleapis.com/auth/userinfo.email")
  defp authorize_url!(_), do: raise "No matching provider available"

  defp get_token!("google", code),   do: Google.get_token!(code: code)
  defp get_token!(_, _), do: raise "No matching provider available"

  defp get_user!("google", client) do
    %{body: user, status_code: status} = OAuth2.Client.get!(client, "https://www.googleapis.com/plus/v1/people/me/openIdConnect")
    %{email: user["email"], domain: user["hd"], email_verified: user["email_verified"], avatar: user["picture"]}
  end
end
Now the above controller code is pretty much straight from scrogson’s repository with a few minor changes. Namely, I altered the get_user! method to parse information from the Google OAuth handshake a bit differently. Also, as of this writing, I noticed the get_user! method in scrogson’s repository didn’t work out of the box due to a different data structure I encountered.
I don’t know if Google changed the response it sends back or what happened.
Step 3 – Create a Google OAuth strategy module
One thing I had to do differently from the scrogson repository is to change the signature call of OAuth2.client.get_token!.
I had to use the following line of code in the get_token! method:
OAuth2.Client.get_token!(client(), Keyword.merge(params, client_secret: client().client_secret))
defmodule Google do
@moduledoc """
An OAuth2 strategy for Google.
"""
use OAuth2.Strategy
alias OAuth2.Strategy.AuthCode
defp config do
[strategy: Google,
site: "https://accounts.google.com",
authorize_url: "/o/oauth2/auth",
token_url: "/o/oauth2/token"]
end
# Public API
def client do
Application.get_env(:competitive_networks, Google)
|> Keyword.merge(config())
|> OAuth2.Client.new()
end
def authorize_url!(params \\ []) do
OAuth2.Client.authorize_url!(client(), params)
end
def get_token!(params \\ [], headers \\ []) do
OAuth2.Client.get_token!(client(), Keyword.merge(params, client_secret: client().client_secret))
end
# Strategy Callbacks
def authorize_url(client, params) do
AuthCode.authorize_url(client, params)
end
def get_token(client, params, headers) do
client
|> put_header("Accept", "application/json")
|> AuthCode.get_token(params, headers)
end
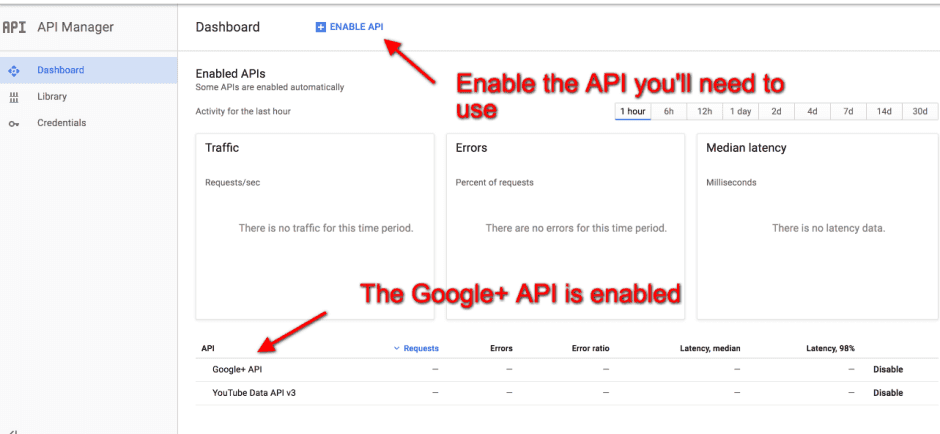
endStep 4 – Enable The Google Plus API
You’ll need to enable the Google Plus API from the Google developer’s console.
Step 5 – Create your credentials and register a redirect url
First, click the create credentials button.
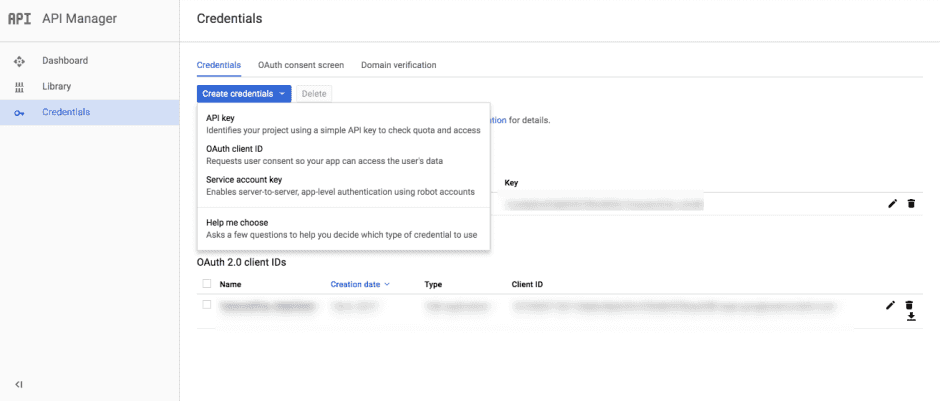
Next, you’ll see your client id and client secret. You’ll also need to put in a redirect URL for the OAuth callback.
Step 6 – Configure your app with the client id and client secret
In config.exs, you’ll set up a client id, client secret and redirect url for your oauth callback.
config :my_app, Google,
  client_id: System.get_env("CLIENT_ID"),
  client_secret: System.get_env("CLIENT_SECRET"),
  redirect_uri: System.get_env("REDIRECT_URI")
Step 7 – Set up your routes in router.ex
scope "/auth", MyApp do
    pipe_through :browser

    get "/:provider", AuthController, :index
    get "/:provider/callback", AuthController, :callback
    delete "/logout", AuthController, :delete
  end
Step 8 – Setup your views
Create a template in web/templates/layout in sign_in_sign_out.html.eex.
<%= if @current_user do %>
  <h2>Welcome, <%= @current_user.email %>!</h2>
  <img src="<%= @current_user.avatar %>" class="img-circle"/>
  <%= button "Logout", to: auth_path(@conn, :delete), method: :delete, class: "btn btn-danger" %>
<% else %>
  <br/>
  <br/>
  <a class="btn btn-primary btn-lg" href="<%= auth_path @conn, :index, "google" %>">
    <i class="fa fa-google"></i>
    Sign in with Google
  </a>
<% end %>
Now add sign_in_sign_out.html to the template in web/templates/layout/app.html.eex.
<!DOCTYPE html>
<html lang="en">
  <head>
    <meta charset="utf-8">
    <meta http-equiv="X-UA-Compatible" content="IE=edge">
    <meta name="viewport" content="width=device-width, initial-scale=1">

    <link href="//maxcdn.bootstrapcdn.com/font-awesome/4.2.0/css/font-awesome.min.css" rel="stylesheet">
    <link rel="stylesheet" href="<%= static_path(@conn, "/css/app.css") %>">
    <title>MyApp</title>
  </head>

  <body>
    <div class="jumbotron">
      <h2>Welcome to Your App</h2>
    </div>
    <div class="container">
      <header class="header">
        <nav role="navigation">
          <ul class="nav nav-pills pull-right">
            <%= render "sign_in_sign_out.html", conn: @conn, current_user: @current_user %><br><br>
          </ul>
        </nav>
      </header>
    </div>
    <div class="container">
      <div class="row">
        <div class="col-xs-12 col-md-8">
          <main role="main">
            <%= render @view_module, @view_template, assigns %>
          </main>
        </div>
      </div>
    </div>
  </body>
</html>
Step 9 – Add a user model
defmodule MyApp.User do
  use MyApp.Web, :model

  def name(user), do: user["name"]
  def email(user), do: user["email"]
end
Step 10 – Add a .env file for local testing
export GOOGLE_CLIENT_ID=xxx
export GOOGLE_CLIENT_SECRET=xxx
export GOOGLE_REDIRECT_URI=xxx
Step 11 – Try it out!
- Type source .env at the command line.
- Run mix phoenix.server and navigate to the home page.
When you click on the login button, behind the scenes you’ll get a response back from Google that looks something like the following.
%OAuth2.Response{body: %{"email" => "bruce@fakedomain.com", "email_verified" => "true", "family_name" => "", "given_name" => "", "hd" => "binarywebpark.com", "kind" => "plus#personOpenIdConnect", "name" => "", "picture" => "https://lh5.googleusercontent.com/-bGZdkE34lMA/BBBAAAAAI/AAAAAAAAABo/VlNNKYfRHI8/photo.jpg?sz=50", "sub" => "113114266206295700617"}, headers: [{"expires", "Sun, 05 Feb 2017 05:04:35 GMT"}, {"date", "Sun, 05 Feb 2017 05:04:35 GMT"}, {"cache-control", "private, max-age=0, must-revalidate, no-transform"}, {"etag", "\"FT7X6cYw9BSnPtIywEFNNGVVdio/iIt_m-6wkBxd2q2IbOAHtsO7YPc\""}, {"vary", "Origin"}, {"vary", "X-Origin"}, {"content-type", "application/json; charset=UTF-8"}, {"x-content-type-options", "nosniff"}, {"x-frame-options", "SAMEORIGIN"}, {"x-xss-protection", "1; mode=block"}, {"content-length", "330"}, {"server", "GSE"}, {"alt-svc", "quic=\":443\"; ma=2592000; v=\"35,34\""}], status_code: 200}Summary & Resources
Once again, here are the links to the article(s) and example repositories I described.
- Reference article on Google OAuth in Phoenix
- Example code repository by scrogson.