OAuth Tutorial: Your Guide to Understanding OAuth 2.0 Protocol
Recently, I had to implement an OAuth 2.0 provider on a slimmed down Rails 5 application. In reality, it’s probably more like an “OAuth 1.5” implementation, but I’ll save that for another post.
Prior to reading up on OAuth, my understanding of it consisted of the social media buttons you see on websites that read “Sign in via Google”. I wasn’t familiar with how it all worked under the hood.
So I began to read up on the various libraries that implemented OAuth and the issues around it. During this reading, I realized a better understanding was necessary in order to understand the nuances in implementing it.
Since this was a time-sensitive project, I wanted to come up to speed quickly on the OAuth specification and implement it.
Consequently, I read a few chapters out of this book by Manning called OAuth2 in Action.
This helped me understand the specification more deeply and gave me more confidence as I implemented it.
I used the doorkeeper gem to turn the Rails 5 application into an OAuth provider.
In this article all references to OAuth refer to OAuth 2. If I need to talk about OAuth 1.0, I will use the term “OAuth 1.0”. Now, let’s talk about why you want to understand OAuth.
You should understand this protocol because:
- It is widely used in the real world
- There are plenty of libraries and resources that have sprung up to support it
- You’ll see it used around the world wide web
A Brief History and the Motivation Behind the Protocol
Understanding how authorization was done in the “early days” will help you understand how OAuth came about. To briefly sum up what I read in the Manning book on OAuth, in the old days if a client program wanted to access a protected resource (say a printer) as a “user”, they would need to present that user’s “access credentials.”
But how does that “client program” prove it has the user’s permission to do so? Easy. It uses the user’s name and password.
To get the user’s credentials (name and password in this case), the client program would have to ask the user.
To avoid the security risks that accompany homemade schemes (e.g., password sharing) for providing access to protected resources across a distributed network (e.g., the Internet), OAuth was born.
OAuth Is a Delegation Protocol
One interesting thing I learned from the Manning book is that OAuth is a delegation protocol in actuality, although it’s often thought of as an authorization protocol. Why the distinction?
It’s true that OAuth insists a user (or service acting on a user’s behalf) prove they have the appropriate permission to access a protected resource. That’s the authorization bit. But OAuth also allows a client to request a “portion” of the user’s authority and ask a user’s permission to use that authority.
For example, a client program can ask if they have permission to access a user’s files on Dropbox. At this point, the user can choose to allow give the program access. That’s the delegation bit.
Authorization and Authentication
In learning OAuth, you’ll hear two terms come up – authorization and authentication.
The standard literature refers to OAuth as a delegated authorization protocol. I used to confuse authentication and authorization. But these two terms mean entirely different things.
Authentication refers to identifying that a user is who they say they are. For example, is John actually John?
The term authorization refers to what a user is allowed to do. For example, is John old enough to drink?
OAuth Actors
You’ll often hear about actors as you scour the Internet. The resource owner, authorization server, client, and the protected resource itself are the 4 actors in an OAuth system.
- resource owner – This is the entity that tells a client acting on its behalf that that client can access a protected resource (or something belonging to the resource owner)
- client – This is the entity, typically an application, that wants to access a resource owner’s protected resource and needs the resource owner’s permission to do so.
- protected resource – This is the resource that a user will allow a client to access. As a more concrete example, it could be a bunch of tweets on Twitter.
- authorization server – This entity issues an access token to the client that lets it know it’s ok to access a protected resource on a resource owner’s behalf.
A Concrete Example: Signing in to Buffer Via Twitter
Let’s walk through an example OAuth flow to give you a more concrete understanding. The OAuth 2 specification calls out 4 different OAuth flows.
However, for simplicity’s sake, I’m going to walk through the most common flow, the authorization grant flow.
Buffer is an app that lets you schedule your social media posts in advance. To keep it simple let’s pretend you’re only scheduling tweets.
Step 1 – Identify the Actors
Buffer has implemented a Login with Twitter OAuth flow. Let’s identify the 4 actors in the system. The resource owner is you the Twitter user. The client, in this case, is the Buffer app, which wants to post to your Twitter feed on your behalf. The protected resource is your Twitter stream. The authorization server, in this case, is Twitter. The Twitter authorization server issues an OAuth access token to the client (Buffer) to allow it to post to your Twitter stream on your behalf.
Step 2 – Click “Login with Twitter” on the Buffer
For the sake of simplicity, I’m assuming the folks at Buffer have implemented the “authorization grant” (standard) OAuth flow. I don’t claim to have firsthand knowledge that this is true. Rather, I make this claim to give you an idea of the basic standard OAuth implementation.
In this flow, the OAuth actors are:
- Buffer – the client
- You – the resource owner
- Your twitter stream – the protected resource that we want buffer to be able to post tweets to
- Authorization server – Whatever server Twitter is providing where you enter your username and password
Step 3 – Get Authorization Code
To start this process, you (resource owner) click “Login With Twitter” on the Buffer (the client) app. Now, you are redirected to the authorization server’s endpoint. Once here, you authenticate yourself and authorize the client (Buffer) to act on your behalf.
Once you do this, the Twitter authorization server redirects your browser back to the client application (Buffer) with a one-time use authorization code.
Step 4 – Get the Access Token
Next, the client will send the authorization code along with a “client id” and “client secret” (think of these as 2 secret keys) to the authorization server. Assuming these credentials are valid, the authorization server then passes back an access token (usually with some kind of expiration) for the client app (Buffer) to use in order to act on your behalf as the resource owner.
Step 5 – Access the Protected Resource
Now Buffer finally can post to your Tweet stream by providing the access token to Twitter each time it wants to post.
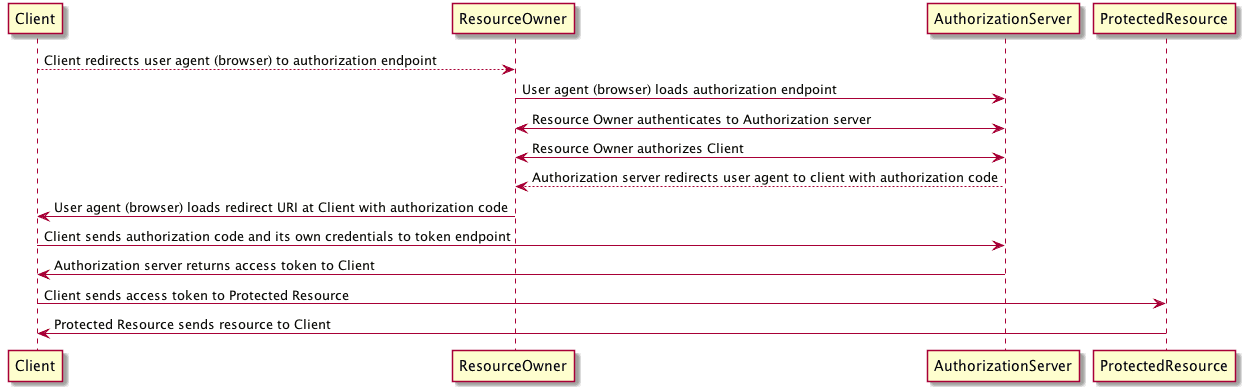
Diagram for Steps 1-4
For those of you who appreciate a good diagram like I do, here’s a simple diagram to illustrate the process:
Summary
- OAuth 2 is a delegated authorization protocol. This means you as a resource owner can delegate a subset of your authority to a client application accessing a protected resource.
- The resource owner, client, protected resource, and authorization server are the 4 actors in the system.
- The most common flow will involve a client id, client secret, authorization code, and access token. This flow is usually referred to as an authorization grant flow.