
The IDEEAA Process: The 6 Phases I Go Through For Starting a Side Project
Step 1: Ideation
So what is ideation? Ideation is the process of coming up with ideas. Think back to a time you were bored and you were wondering what to do.
I bet you had to come up with some ideas, right? Congratulations, you were doing ideation and you didn’t know it!
Now one important aspect of ideation is that you allow your ideas to flow freely without judgement. There’s no such thing as a “bad idea” or a “wrong idea”. There are only ideas.
Getting Started with Ideation Even If You Have No Ideas
But what if you have no ideas? This is where step A comes in.
Ideation Step A – Brainstorm
So the first step in ideation is to set a timer for 20-30 min and brainstorm every crazy idea for a side project you want to build. Don’t stop until you get at least 10 ideas. And of course, if you get more by all means keep going.
If you’re stuck for ideas, try asking yourself the following questions:
- What problems have I encountered in the past month that could be automated with software?
- What problems have I seen others encouter in the past month that might make for a cool side project?
- Reflect on your daily life. Is there something there that could be made into a side project?
Ideation Step B – Getting Unstuck
Now let’s say you’re completely stuck and haven’t come up with one idea. You have 2 options.
Option 1 – Copy
Copy a product or website you like. For example, you could build a reddit or Facebook clone.
Option 2 – Google for It
If you’re stuck for ideas, you can google for “side project” ideas. Or you can check out this repository.
Ideation Step C – Get Organized
Pencil and paper is a fine place to record your ideas. If you really like a few of your ideas, jot them down someplace. I’ve used Evernote and Trello as places to record ideas with some details about why I wanted it and any reference notes I found.
Why do I do this? It’s because in a few months I may want to revisit ideas and it saves me time from having to recall what was going on in my head at the time.
Ideation Summary
So now you have the tools you need to do side project ideation. In Step 2, you’re going to make a decision.
The difference between ideation and deciding is that ideation is where you allow ideas to flow freely (no judgement) and decision is where you recognize you have limited time and need to pick one. Decision is where we let your inner editor come out to play.
Step 2: Decide
If you’ve done the ideation step, you hopefully have a few ideas to choose from. If not, try to go back and get at least 10 ideas jotted down.
Now you get to decide which project you want to take on. So how do you make the decision now that you have all these great ideas?
There are a couple of primary dimensions I like to optimize for when deciding.
Optimize for fun
The first is fun. Since I’m likely to be working on this project in my free time, having something I want to work on will help keep me motivated in the long run.
Optimize for learning skills
The second dimension I like to optimize for is enhancing my work skills so I can keep working in the technology field. But mostly fun.
Other optimizations
You can even add a monetary dimesion. For instance, you could decide to work on a side project because you think it will help you land a side gig if you feature it as a portfolio piece.
Try a Decision Matrix If Things Get Too Complicated
Because I like to analyze, I find sometimes I think about a lot of factors before I make a decision.
Once I start getting to 3 or 4 factors, I like to use a weighted decision matrix to make a decision. This is especially true if I’m having a hard time deciding.
A weighted decision matrix is a system where you score how important each factor in your decision is, and the option with the highest score is your decision. To give you a more concrete idea, below is a screenshot of an example.
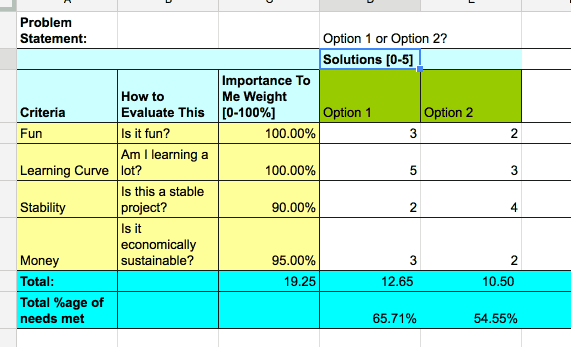
If you’d like, I made a downloadable Excel template. Just [click here] to opt-in.
Decision Summary
If it’s a small side project, chances are you can decide on something fun (and perhaps try to learn something new). If you have larger ambitions, perhaps a decision matrix can help you.
Step 3: Examine
Now that you’ve made a decision on your side project, it’s time to do a little examination.
Unless you want to build every single part of your project from scratch, you can save a lot of time by leveraging what other people have built in open source.
So if you wanted to learn Angular for example, you can start by searching for useful Angular libraries that will help you build your side project.
To give you more context, when I wanted to try Angular for the first time, I decided to keep it simple by using the angular-rails gem so I didn’t have to deal with front-end tooling. This would enable me to focus puerly on Angular syntax and not worry about how to install Angular libraries via gulp or grunt or some other mechanism.
The Two Criteria I Use for Quickly Evaluating Whether I Should Use an Open Source Library
I like to use 2 criteria to evaluate whether I should use an open source library in my side project.
Criterion 1 – Is it popular as judged by the number of GitHub stars?
I like to use open source projects that have at least 100 GitHub stars. Why? This shows the project is being used by other programmers out there on the Internet.
Criterion 2 – There have been commits within the last few months
If the maintainer of the project is actively supporting the library, this is a good indicator that the library will work with all the latest stuff I plan to use.
Make Notes on What You Want to Use
Now that you have an idea of what open source libraries you might want to use, be sure to add links and/or notes about them in whatever project planning tool you are using.
Summary of Examination
Hopefully, you’ve examined what’s out there and have made some notes to yourself. Preparing a little bit will help you get started more quickly. Now it’s on to determining the minimum amount of features you will build!
Step 4: Enumerate the minimum viable feature set
Now that you’ve examined the open source tools available to you, you can start focusing on the feature set for your side project.
The first thing I like to do is get organized.
Step A – Name the project
Come up with a cool name for your project. Later on, you might put it in your portfolio or push it up to your GitHub account to show others, so why not come up with a great name?
Step B – Describe the project so a layman can understand it
Describe what problem your project attempts to solve so that a layman can understand it (or if not, so that an engineering manager can understand it if it’s more technical in nature).
Doing this now will help you explain it clearly to others in the future as well as prepare good documentation for your side project. The more clear it is to other people, the better the chance your project has of taking off and becoming Internet famous!
Step C – Enumerate the MVP feature set
Now you’re going to list the minimum number of features needed to make a MVP (mininum viable product). It’s easy to come up with lots and lots of features.
The hard part is to constrain yourself to the least amount of features needed to make it functional. It’s pretty much up to you. As I said in the post about completing side projects, the trick is to build the skateboard, not the car.
This will help you complet it. I like to make a checklist in Trello, but you should use whatever makes you comfortable.
Step D – Add notes and research as needed
Don’t forget to add notes and research as needed. You’ll thank yourself later if you ever have to come back to this project.
Summary
Ok, hopefully you have a minimum viable feature set. It’s almost time to start building.
Step 5: Approximate and Track (Optional)
This is an optional step, but it can be a fun one if you’re like me and you’re into productivity and time management.
Software estimates are notorious for being inaccurate. The point of this is to give you comparison points as you go along. You can track how long you think something will take and measure it against how long it actually took.
This will help you in planning your side projects in the future.
You can use whatever system you’d like. I’ve used everything from a spreadsheet to a time tracking and client billing tool like Freshbooks.
Summary
Ok, if you’re setup to track your time, it’s time to start building!
Step 6: Action
The last step is the one. You get to start building. If you’re a busy adult like me, you might have multiple responsibilities to juggle.
This is why you need to dedicate some time on your calendar. Because it can take some time to get in the swing of things, I recommend setting aside at least 30 minutes (especially if you lack time on a weekday). Incidentally, this is something John Resig of jQuery fame did to work on his skills.
You can also block off a chunk of time on the weekend. I personally like to take 1-2 hour blocks. I prefer 2 hours, because I find I can really get into a state of flow. It doesn’t matter how much time you dedicate at first. You’ll figure out what works best for you after a while.
Summary
Hopefully with the IDEA process in hand, you have the tools you need to complete your side project. Go forth and build!