
Beginner’s Guide to Using Github Pages With Your Own Custom Domain for Your Portfolio
As a web developer, I’m sure you appreciate the importance of an online portfolio. For a long time, I used Hostgator to run my WordPress blog and used that as a double for a portfolio site.
But eventually, I started migrating to Digital Ocean and was paying Hostgator to do….nothing.

In the interim, Github started allowing developers to host static websites via Github pages.
Essentially, Github pages is a free static site hosting service that will let you host your personal, organization or project pages a la a Github repository.
And who doesn’t love free?
That’s why this article will show you how to make your own static site portfolio using a custom domain on GitHub pages. But first, I need to tell you about Middleman.
Using Middleman to Construct Your Static Site Portfolio
As a ruby programmer, one of the best tools I’ve found to roll your own static site is Middleman.
While updating my portfolio as I changed jobs, I realized a WordPress blog was not the best place to post your portfolio. After a bit of research, I realized I really wanted a separate static site.
Why have a static site?
Furthermore, I wanted a place where I could easily update descriptions of projects I had worked on. Plus, I wanted a nice layout that I could easily customize. Since I’m not a WordPress developer, modifying HTML/CSS markup would be much easier than trying to hunt for and/or customize a WordPress plugin to do it for me.
Also, static sites load faster than their dynamic counterparts.
Why use Middleman?
Now, since I decided to use HTML markup (especially the Twitter Bootstrap-like markup I was using), it would have been nice to use things from Ruby on Rails like “partials”.
For those of you who don’t know what those are, partials are basically templates that cut down on repetitive code in HTML pages.
For example, you may have a “menu partial” and that way you update one menu template instead of the same menu template across your portfolio’s site pages. Consequently, partials save you quite a bit of time.
Middleman gives you those capabilities as well as the option to use popular templating languages such as Haml. Personally, I like Haml because it’s easier to read as a coder and it’s easier to write. Unlike raw HTML, you don’t have to write opening and closing tags.
Also, since Middleman is built in Ruby, it’s easy for me to understand how everything works.
Finally, now that you understand the reasons for a static site portfolio, it’s now time to get started constructing one.
Step 1 – Getting Started With Middleman
All you really need to get started is to create a project with a GitHub repository and a Gemfile with Middleman.
My Middleman Gemfile
Below is a copy of my Gemfile. I’m going to assume you have some experience with Ruby and environment management tools like rbenv.
Depending on when you’re reading this, you might have to upgrade the gem versions. You just need the middleman gem, not middleman-livereload or the other gems which I think I used due to wanting live reload capabilities on multiple platforms.
# If you do not have OpenSSL installed, update
# the following line to use "http://" instead
source 'https://rubygems.org'

gem "middleman", "~>4.1.6"

# Live-reloading plugin
gem "middleman-livereload", "~> 3.1.0"

# For faster file watcher updates on Windows:
gem "wdm", "~> 0.1.0", :platforms => [:mswin, :mingw]

# Windows does not come with time zone data
gem "tzinfo-data", platforms: [:mswin, :mingw, :jruby]
Step 2 – Configuring Middleman with config.rb
Below is a snapshot of how I configure my asset directory paths with middleman (images, CSS, and JavaScript files). Yours might look slightly different depending on whether you choose to use Haml or the paths you choose for your asset directories.
set :css_dir, 'stylesheets'

set :js_dir, 'javascripts'

set :images_dir, 'images'

# Build-specific configuration
configure :build do
  # For example, change the Compass output style for deployment
  # activate :minify_css

  # Minify Javascript on build
  # activate :minify_javascript

  # Enable cache buster
  # activate :asset_hash

  # Use relative URLs
  # activate :relative_assets

  # Or use a different image path
  # set :http_prefix, "/Content/images/"
  set :haml, { :ugly => true, :format => :html5 }
end
Step 3 – Setting Up Your Directory
You will make edits in the source directory. Then once you issue a middleman build command, middleman will turn your templating language markup into the raw HTML needed for your static website.
To help you get up and running quickly, I’m going to show you the directory structure for my own portfolio site.
What My Directory Tree Looks Like
You’ll notice the directories I specified in config.rb as well as the partial files I have in the layout directory. I use the partials for things like the site header and footer.
.
├── Gemfile
├── Gemfile.lock
├── README.md
├── build
│   ├── CNAME
│   ├── images
│   │   ├── background.png
│   │   └── middleman.png
│   ├── index.html
│   ├── javascripts
│   │   ├── all.js
│   │   └── responsive_menu.js
│   └── stylesheets
│       ├── all.css
│       ├── marketing-old-ie.css
│       ├── marketing.css
│       ├── normalize.css
│       ├── responsive_menu.css
│       └── side-menu.css
├── config.rb
└── source
    ├── images
    │   ├── background.png
    │   └── middleman.png
    ├── index.html.haml
    ├── javascripts
    │   ├── all.js
    │   └── responsive_menu.js
    ├── layouts
    │   ├── _header.html.haml
    │   ├── _header2.html.haml
    │   ├── _lc_work.html.haml
    │   ├── _menu.html.haml
    │   ├── _skills.html.haml
    │   ├── _usc_work.html.haml
    │   └── layout.html.haml
    └── stylesheets
        ├── all.css
        ├── marketing-old-ie.css
        ├── marketing.css
        ├── normalize.css
        ├── responsive_menu.css
        └── side-menu.css
Step 4 – Start coding your site locally
Once you have a setup like the one described above, you can begin working on your portfolio locally. You are also ready to push the code to your repository.
If this is your first time using Middleman, you may find it useful to read up on the command to start a new site. It’s pretty straightforward if you’re familiar with Ruby.
Getting Ready to Deploy to Github Pages
In the paragraphs above, I described the 4 steps I used to roll my own static portfolio site on GitHub. Now, I cover how to use Namecheap, GitHub, and the middleman-deploy gem to automatically deploy your site up to GitHub.
Step 1 – Setting Up Git
For your recollection, below is the tree diagram of my current directory setup. The easiest thing I found to get started was to setup a Git repository in the build directory and another Git repository in the top level directory.
.
├── Gemfile
├── Gemfile.lock
├── README.md
├── build
│   ├── CNAME
│   ├── images
│   │   ├── background.png
│   │   └── middleman.png
│   ├── index.html
│   ├── javascripts
│   │   ├── all.js
│   │   └── responsive_menu.js
│   └── stylesheets
│       ├── all.css
│       ├── marketing-old-ie.css
│       ├── marketing.css
│       ├── normalize.css
│       ├── responsive_menu.css
│       └── side-menu.css
├── config.rb
└── source
    ├── images
    │   ├── background.png
    │   └── middleman.png
    ├── index.html.haml
    ├── javascripts
    │   ├── all.js
    │   └── responsive_menu.js
    ├── layouts
    │   ├── _header.html.haml
    │   ├── _header2.html.haml
    │   ├── _lc_work.html.haml
    │   ├── _menu.html.haml
    │   ├── _skills.html.haml
    │   ├── _usc_work.html.haml
    │   └── layout.html.haml
    └── stylesheets
        ├── all.css
        ├── marketing-old-ie.css
        ├── marketing.css
        ├── normalize.css
        ├── responsive_menu.css
        └── side-menu.css
You could try Git submodules, but I personally was interested in shipping as fast as possible (especially since this was a portfolio site), so I opted for 2 separate repositories.
To facilitate this, I have 2 separate Git remotes. If you type git remote -v at the command line in my repo, you’ll see something like this:
gh-origin	git@github.com:treble37/treble37.github.io.git (fetch)
gh-origin	git@github.com:treble37/treble37.github.io.git (push)
origin	git@bitbucket.org:treble37/brucepark_io.git (fetch)
origin	git@bitbucket.org:treble37/brucepark_io.git (push)
Step 2 – Setting up middleman-deploy
If you’ve been following this tutorial, you should already have middleman in your Gemfile. Now we’re going to add middleman-deploy to your Gemfile as below.
# If you do not have OpenSSL installed, update
# the following line to use "http://" instead
source 'https://rubygems.org'

gem "middleman", "~>4.1.6"

# for deploying to github pages
gem 'middleman-deploy', '~> 2.0.0.pre.alpha'

# Live-reloading plugin
gem "middleman-livereload", "~> 3.1.0"

# For faster file watcher updates on Windows:
gem "wdm", "~> 0.1.0", :platforms => [:mswin, :mingw]

# Windows does not come with time zone data
gem "tzinfo-data", platforms: [:mswin, :mingw, :jruby]
Step 3 – Adjusting your config.rb
Now we’re going to add to the config.rb file from the previous steps. Add the activate :deploy block per the below config.rb file. You will have to adjust the values of deploy.remote and deploy.branch to appropriate values.
set :css_dir, 'stylesheets'

set :js_dir, 'javascripts'

set :images_dir, 'images'

# Build-specific configuration
configure :build do
  # For example, change the Compass output style for deployment
  # activate :minify_css

  # Minify Javascript on build
  # activate :minify_javascript

  # Enable cache buster
  # activate :asset_hash

  # Use relative URLs
  # activate :relative_assets

  # Or use a different image path
  # set :http_prefix, "/Content/images/"
  set :haml, { :ugly => true, :format => :html5 }
end

activate :deploy do |deploy|
  deploy.deploy_method = :git
  # Optional Settings
  deploy.remote   = 'gh-origin' # remote name or git url, default: origin
  deploy.branch   = 'master' # default: gh-pages
  # deploy.strategy = :submodule      # commit strategy: can be :force_push or :submodule, default: :force_push
  # deploy.commit_message = 'custom-message'      # commit message (can be empty), default: Automated commit at `timestamp` by middleman-deploy `version`
end
It’s likely your deploy.branch value will be master if you setup your GitHub repository to your-github-username.github.io. If you created a differently named repository, then the value will be gh-pages per the GitHub documentation.
Step 4 – Configuring 2 remotes
As I ran the middleman-deploy command, I received a Can’t deploy error. Since my deploy.remote value is set to gh-origin in the config.rb file, I have to configure my Git remotes as follows in the build directory:
gh-origin	git@github.com:treble37/treble37.github.io.git (fetch)
gh-origin	git@github.com:treble37/treble37.github.io.git (push)
origin	git@bitbucket.org:treble37/brucepark_io.git (fetch)
origin	git@bitbucket.org:treble37/brucepark_io.git (push)
The command I used is git remote set-url gh-orgin git@github.com:treble37/treble37.github.io.git.
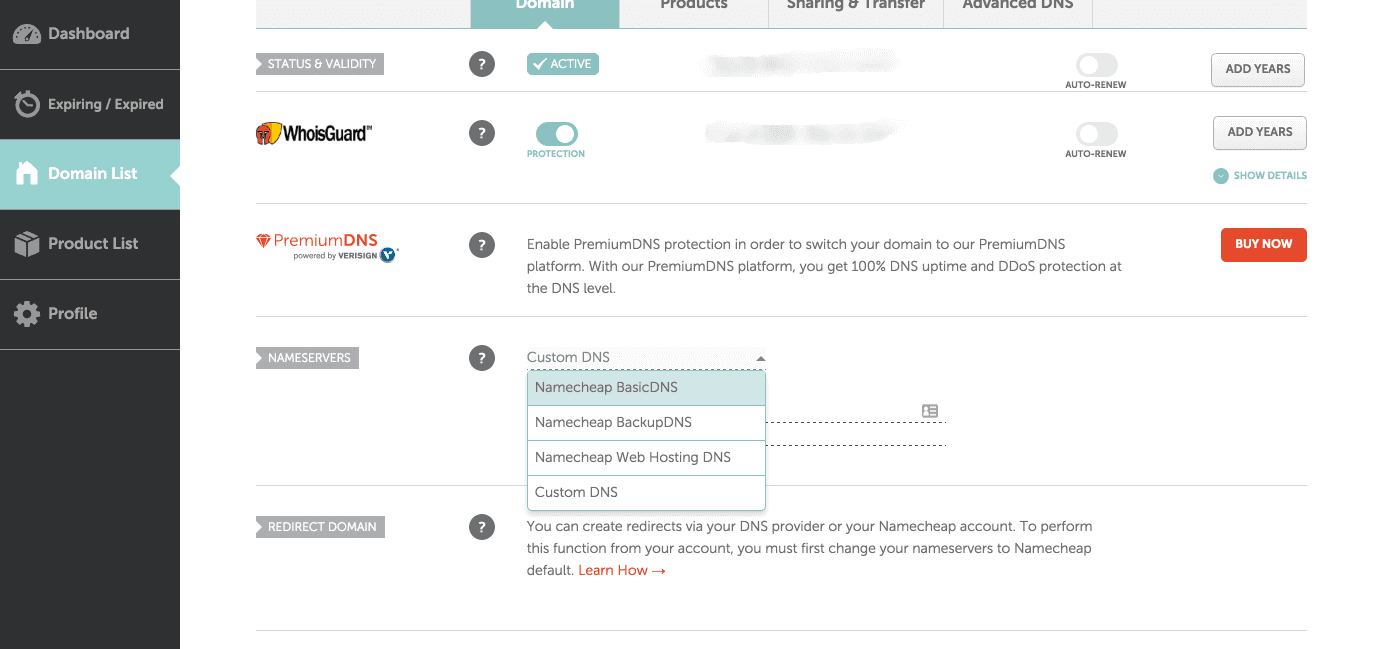
Step 5 – Use “Namecheap Basic DNS”
Since I originally hosted my portfolio site on Hostgator, I also had to change my Namecheap DNS settings. I clicked on “Manage” for my brucepark.io domain in the Namecheap interface and set it from “Custom DNS” to “Namecheap Basic DNS”.
Step 6 – Setting Up Your Domain on GitHub and Namecheap
You also need to do the following:
- Add a CNAME file to your build directory in your repository
- Create 2 A records and a CNAME record on Namecheap
- Setup your custom domain on GitHub
For the first 2 bullet points regarding the CNAME and the A records, you can follow the directions from Namecheap on this page.
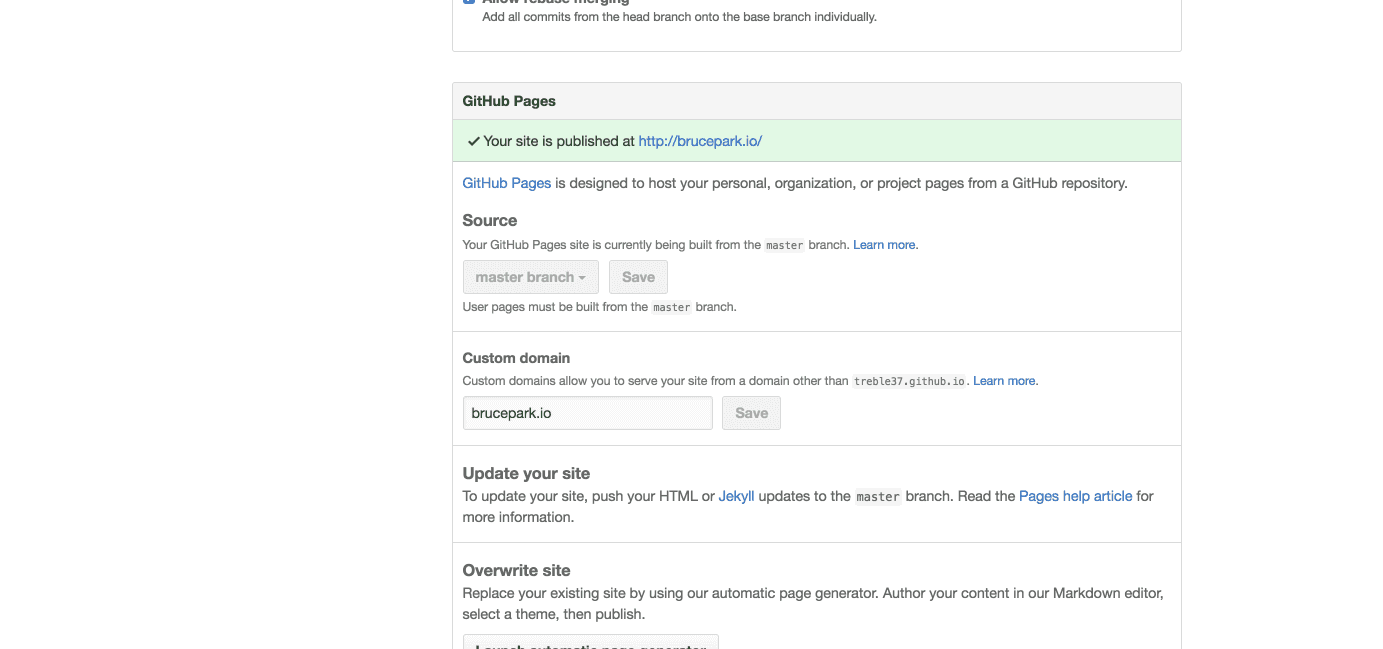
For setting up your custom domain on GitHub, you navigate to the repository on GitHub of your portfolio, click Settings and add a custom domain under the Custom Domain section. You can see how I set it up from the image below.
Step 7 – Running middleman deploy command
Finally, you can run bundle exec middleman deploy If everything has been setup properly, the portfolio source code in your source directory will be compiled into your build directory and then pushed automatically up to your github directory.
You’ll have to push your source directory up to bitbucket (or whatever repository you are using to host your source directory).
Summary
In this article, I talked about using Middleman and your DNS provider to roll your own static site portfolio on GitHub pages. To summarize the steps:
- Use Middleman to code your static site
- Use the middleman-deploy gem to help deploy your static site HTML to GitHub pages
- Configure your settings properly on both GitHub and your DNS provider